

The Marlin Cabin Cruiser (Vintage Model Works)

By mturpin013 26 entries 5 Sep 2022 — 26 Aug 2023
309Likes
59Comments
Chapter 21 / 26

26 chapters · Page 3 of 3

20 Cabin Front continued

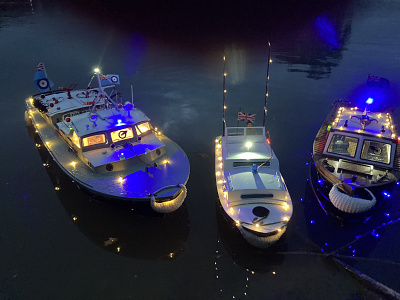
The cabin is now complete and the electrics have been added, this comprises of navigation lights, internal cabin lights which are powered through 3mm bullet connectors 4 in all 1 neg and 3 positive all operated through RC switches.
All the windows have Perspex inserts and will need an chrome look surround. these are made from 1mm styrene sheet, I pencilled around the window profiles and cut the external profile (the easy bit) I then drilled 4mm holes at each of the corners.
Next I made a simple jig which would allow me to mill the internal profile by hand, first setting the 3mm thickness and a couple of pins to stop the sheet lifting each piece was moved around cutting away the centre using a 2mm slot drill.
A final deburr and light surface sand (1200 grit) to make sure the chrome pen adheres well. these will be applied on final assembly.
Liked by robbob and ChrisG and

21 Cabin rear

The cabin has a rear section which when built as a fixed unit would have made it strong and rigid. However as I’m building a removable cabin I will have to add some additional 4x4 stiffeners around the sides and across the end so when its removed it remain rigid. The sides have what I think would be Chrome trim (4 strips) these are made of wood and have been painted along with the rest of cabin and then have been covered with adhesive aluminium foil ( the old fashioned tape used on window alarm systems) its worked well and looks the part.
Liked by robbob and MouldBuilder and

22 Painting

The cabin cruiser needs to be painted as soon as possible so it can properly harden for a few weeks. I use cellulose paints (a left over mind set from spraying cars) This Cruiser will have a first coat of etch primer followed by 4 coats of standard grey primer with any filling and smoothing in between coats.
The whole hull will first be sprayed with a white gloss and will receive three to four coats, I prefer to give a number of thin coats this avoids the chances of any runs, which always cause problems, as they need to harden before being flattened.
The hull has been left to harden four a week; it is now hard enough to turn back on its stand. I now need to draw the water line around the hull. I do this by levelling the hull according to the “plans water line” and then using a height gauge with a pencil attached instead of the scriber I pencil a line around the whole hull.
Next masking the lower half of the hull leaving the area to be painted a very light green, again a number coats are applied to give a good depth of paint. The cabin also gets a coat of the green paint, having been painted white on the inside
I will now leave the paint to harden for 2-3 weeks before attempting to finally polish it to a high sheen.(hopefully)
Liked by robbob and MouldBuilder and

Windscreen

The front cabin has a windscreen, which is made from clear plastic sheet, which is supplied in the kit, this was roughly the correct shape. To bend the piece at the right angles I heated a piece of 2mm rod and held the bend line over it but not touching until it was pliable I then bent it to the correct angle drawn on a plan. I I felt that the sheet now the correct shape needed some solid surround. To match the rest of the boats wood it needed to be made from a dark wood such as walnut. I cut square sections 5 x 5 mm and then cut a 1mm slot along its length.
This was then cut into required pieces to slot onto the plastic I cut the screen in half to make it easier to put a central pillar in. the sides presented an issue in that they are curved, so a profile was cut out and carefully a slot was cut into the curve.
The whole assembly was glued together with the assistance of a metal jig and CA and then 1.0 mm pins secure it to the deck
Liked by robbob and jbkiwi and

Deck fittings

The deck fittings are minimal consisting of forward and rear cleats with bollards front and rear. These were all scratch made from brass, and are pinned and epoxied to the deck. Although this takes a lot of time it’s a most satisfying part of a build for me as I consider myself a builder not a sailor.
Liked by GaryLC and RNinMunich and

Final pictures

The build is now complete and we are waiting for the maiden voyage to take place at the earliest opportunity Its been an interesting build with plenty of problems to be solved, but in all the kit is a comprehensive package, supplying a full box of materials covering all the build requirements. The plans are self-explanatory to the intermediate builder leaving nothing to chance.
I have during the build made quite a few deviations from plan such as planking and general additional woodwork, lighting and internal fittings.
My overall comment is that it’s a great kit to build and makes a wonderful model.
Next project is to finish the Inga IV
Liked by Madwelshman and DuncanP and

Delete this post?

It will be removed from the site.

Discard this draft?

Your draft will be deleted and cannot be recovered.

You have an unfinished draft

What would you like to do with it?