

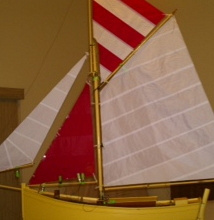
Ketch Barge "Pearl of Ipswich"

By Joe727 17 entries 31 Jan 2019 — 31 Oct 2020
78Likes
40Comments
Chapter 11 / 17

17 chapters · Page 2 of 2

Joe727 #11 of 17 1

Deck & Hatches

Sub-Deck installed and I will have to decide on planking later. Hatches framed out, hatch covers made from basswood side and very thin plywood roofs. Used neo magnets to secure covers in place, these are very strong magnet!

Slot through hull, barely visible, is for the keel. Modifying an old US1Meter keel and lead bulb as needed for sailing at the pond.
Bowsprit bits shown and opening through bow for sprit which will be retractable for transport and storage.

Working on masts and booms to accommodate gaff rigging, etc. Wheelhouse and rudder being designed now.

My focus is on making a RC Sailing boat, so I am not replicating fine details of the original barge, but making everything workable. My background previously has been on racing boats, like the US1Meter class. More to come shortly, working on this full time (retired), started again last night. Thank you for your support.
Joe
Liked by marky and jacko and
Joe727 #12 of 17 1

substructure photos

I found some photos I had prior to decking that I thought might be of use.
Liked by mturpin013 and jacko and
Joe727 #13 of 17 1

Wheelhouse, Masts, Booms, fittings

The Wheelhouse was designed to cover the rudder servo. Just mocked up right now, built with basswood, more detail will be added. Hole in roof is for the Mizzen Sail sheeting. Made two sheeting tubes out of brass which I am about to locate and epoxy through the decking.

Masts are made from birch and are hand tapered with a small wood plane. All booms are made from discarded carbon fiber arrow shafts. I have been using these for years on all of my boats including my 1 meter racing yachts. Fittings are made from bits of wood and brass. I use hand tools to cut and form the brass and wood items.

I spent two years on a work assignment on Grand Cayman Island and I built a Falmouth Gaff rigged cutter to occupy my spare time. All I had was some hand tools I brought with me, I learned to stay away from power tools and got back to the way I learned from my father and grandfather in the 50's. Now, I first try to build most things with hand tools only, it's very satisfying. More to come, thanks for the interest.
Joe
Liked by Ronald and marky and
Joe727 #14 of 17 1

Sail Servo, power switch type

The location of the sail servo was determined by mocking up all sail sheeting and through deck opening locations. Servo is a Futaba S3802, I have used this Servo type on many boats including my US1Meter racing yacht and some sailing fishing trawlers. Very powerful.

The servo arm is scratch built out of carbon fiber sheet and I use fishing pole eyelets in the openings for smooth sliding of the sheets.

While wood glue is drying on the servo mount blocks, I am prepping the power switch. See photo for Dubro switch type that I use on all of my boats. You must buy a small slide switch to mount on this. I modify these by threading a longer metal rod to replace the short one in the kit. This enables me to mount these through the boats deck and keep it above the deck somewhat to keep water sloshing on the deck from getting in the boat.

Examples of the end result are shown in two photos, one from my brooklyn tug and one from my rescue pusher tug.
More to come.
Joe
Liked by Ianh and Ronald and
Joe727 #15 of 17 1

Barge Ketch....back at it!

I started this barge build in early 2019, was not happy with the planking, so it went on the shelf for a year. I did some more work on the hull and continued the build in early 2020. Then back on the shelf while I was building two sailing yachts.

Pulled it back out last week and did some hand painting of the deck, etc. Varnished it today and will continue this build till she's ready to launch.

Yes, I have three sailboats going at once 🙄🙄😁

Joe 😎
Liked by MouldBuilder and Martin555 and
Joe727 #16 of 17 1

Keel build

Designed first. Sketched out the keel design for the barge. Three layers of 1/8" plywood will be laminated together and shaped with a wood plane. Threaded rod will be inserted to allow for the metal bulb attachment. Keel will insert into the boats trunk that is already installed.

Now to let the glue dry for first side lamination.
Joe 😎
Liked by MouldBuilder and jbkiwi and
Joe727 #17 of 17 1

Steel Bulb not lead experiment

Right now I don't really have the setup to cast lead bulbs so I thought I would try something different. Since this is sailing barge and not a racing yacht I thought I could get away with a larger size and less sleek bulb, one made out of steel rather than lead.

I sketched up a design based on the density of steel that would give me about 5 lbs. See sketch. I picked up a 1 3/4" x 12" steel bar from the local metal supply house. Intent was to turn it on my mini lathe which I did but was a lot of work. I had to freehand the curved shape so it's not perfect but will do the job for a barge. End result weighs in at 5.2 lbs!

I will drill a single hull for attachment to the keel and supplement with epoxy. Shown with the still rough shaped keel in photo. Plywood keel will be shaped today with hand planes and sanding. Rough rudder show as well.
More to come..... Joe 😎
Liked by MouldBuilder and mturpin013 and

Delete this post?

It will be removed from the site.

Discard this draft?

Your draft will be deleted and cannot be recovered.

You have an unfinished draft

What would you like to do with it?