

HARTLEY FLARELINE, NEW PROJECT

By jbkiwi 93 entries 7 Jul 2020 — 6 Aug 2022
540Likes
438Comments
Chapter 61 / 93

93 chapters · Page 7 of 10

jbkiwi #61 of 93 1

HARTLEY FLARELINE, NEW PROJECT

While waiting for some stain to dry I thought I'd add a couple of battery monitors. One is just a plug-in adjustable voltage limit alarm for the main battery, the other is a small voltage monitor I found in my collection, which I had forgotten about. Finally put it to good use reading the 1s LiPo which is used for the lights. It is fitted to the underside of the bunk lid for easy reading.

Did a bit of tank testing today, and decided to modify the reversing bucket to try and improve reversing, and re-direct a bit of 'back wash' when in reverse. I've added a bit of a shield on top and a bit on the sides to try and get more water going downwards. Hopefully have that finished by tomorrow once the resin dries.

Also modified the air/water/smoke piping to add air to the water coming out the exhausts. I've run a pipe from the air/smoke line, across to the water out line to the exhausts and fitted a non return valve to hopefully stop any water flowing back to the e-cig smoker and drowning it. There should now be air and smoke through the outer exhaust, and air and water from the inner exhaust tube, to hopefully rough the flow up a bit.
Liked by Colin H and MouldBuilder and
jbkiwi #62 of 93 1

HARTLEY FLARELINE, NEW PROJECT

Finished making the mods to the reversing bucket. A spot of filler and paint again and back to the test tank. Bit of a bugger to f/glass being so small, - had to blob it on and Dremel and sand it back to shape. Has a bit more of a top lip and more down curl on the side chutes.

Also attempting to make some fairleads from aluminium. One turned out reasonably well but the other was a semi failure and will have to be reworked. Hard to file being so small and delicate, and being blind as a bat for small stuff (need 2 pairs of goggles😁) I have a headset magnifier but it gets a bit hard on the eyes after a while. Once painted they should look ok.
Liked by Colin H and mturpin013 and
jbkiwi #63 of 93 1

HARTLEY FLARELINE, NEW PROJECT

A few pics of the model in the test tank. Just a few more small bits to go on the outside, but basically complete externally. Test vid in the media section.
Liked by Colin H and MouldBuilder and
jbkiwi #64 of 93 1

HARTLEY FLARELINE, NEW PROJECT

Got bored so thought I'd try the lights at night in the tank. Unfortunately the big orange streetlight mucks the pictures up and my $1300 Olympus digital SLR does not like taking photos at night (or if it just can't be bothered😠. Shame I sold my Olympus OM1 SLR film camera, as that would do exactly what it was told, night or day!

At least the dash lights show up well (even if out of focus😐) but the interior lights could do with turning up a bit I think.
Liked by Colin H and MouldBuilder and
jbkiwi #65 of 93 1

HARTLEY FLARELINE, NEW PROJECT

Been trying to sort out a way to mount the boarding ladder on the transom while still being able to remove the rear deck. Finally had an idea (better late than never😁)-I managed to drill 1mm holes in the 4 flanged ends of the brass rod with my mini drill and cyano'd in some 1mm rod, leaving about 5mm proud. I measured the rod positions on the transom and deck frame and drilled 1mm holes for the rods, so the top flanges sit the thickness of the deck ply above the frame.

I then filed slots in the rear of the deck ply to slip round the rods. The ladder was fitted with the top holes started first and wiggled down till the transom holes lined up. A small dab of silicone was applied to the rod ends and the ladder pushed into place. Deck slips nicely under the flanges and the slots are barely noticeable.

My nice little extinguishers from Al Ex turned up finally and one was mounted using a cut down plastic protection cap from a 6v lantern battery. Also made a 'radio' for the front cabin cross beam, (picture printed on decal paper with an acetate screen cover and knob from a slice of a 3mm nylon bolt remnant.

Still waiting for more bits for the electrical side so that can be completed. If you could know everything you might need to complete a model then you could order it all at once, but you never will so you can't so you don't😁 There is always something you forget😐 Probably Gods' way of stopping us finding out how much we are spending, by doing it in small bits, as if we knew, we might not make models😂
Liked by Colin H and MouldBuilder and
jbkiwi #66 of 93 1

HARTLEY FLARELINE, NEW PROJECT

A bit more fun playing with BT music transfer to the model. Tried my old smart watch which I've fitted with a micro SD card expansion and it works fine. Only problem is the low power transmission output from the watch, giving a low volume from the BT speaker in the boat, (my cheap phone puts out about 10 times the power of the watch. The better smart watch I have is about 50% louder. Could be fun at the lake, playing music from the watch, (only has a 20ft diam transmission range, but it's all you'd need, as as the boat comes by it will pick up the signal and carry on playing (should be effective for 40ft - 2 x 20ft Rad)

"Who'd 'ave thought, 40 year ago, we'd be sitting here, drinking Chateau De Chasselas and controlling music in our model boats from our wrist watches"? 😁 "Aye, back then we couldn't afford a watch", "or a wrist", "or a sun dial", "Our mother made us look at sun to guess time", "We were too poor to afford a mother",.................................

Thought I'd go with a nautical theme - "any Irish in the house"?😁

JB
Liked by nasraf and Colin H and
jbkiwi #67 of 93 1

HARTLEY FLARELINE, NEW PROJECT

Finally received my voltage regs, (sampan docked today) and the electrical spaghetti is all done, (and I now have lights for Xmas!)😁 11 components on.
Liked by nasraf and MouldBuilder and
jbkiwi #68 of 93 1

HARTLEY FLARELINE, NEW PROJECT

Made a new silver steel 4mm shaft yesterday,-minus the big flat on the front end which should help with a new coupling balance. Still having problems with the coupling due to excessive vibration due to bad Chinese machining. Have ordered 3 different types of couplings from Ali Exp but don't expect to see them before Feb next year. Have modified a new closer fitting prop which is showing promise of more thrust than the std prop. I tried it today with a silicone coupler, but the shaft moved back and the prop hit the flow corrector vanes, (plenty of noise but no damage😁) Really needs a keeper on the shaft to prevent movement. Bearings are typically noisy small Chinese stuff which will be replaced later with better quality stainless NMB bearings.

Looking at possibly changing the motor to a brushless fan cooled 36mm 1600Kv helicopter motor, and 45A HK DLux ESC (or other) for more revs on 3s (hard to find a brushed ESC for 4s). I'll see how the brushed motor goes once the new couplings arrive (and if they are any good) before trying the heli motor. With the heli motor, I'll be able to use 4s for more revs, as the brushed motor is suitable for up to 24v but most brushed ESCs are only for 3s max.
Liked by nasraf and stevedownunder and
jbkiwi #69 of 93 1

HARTLEY FLARELINE, SOMETHING COMPLETELY DIFFERENT

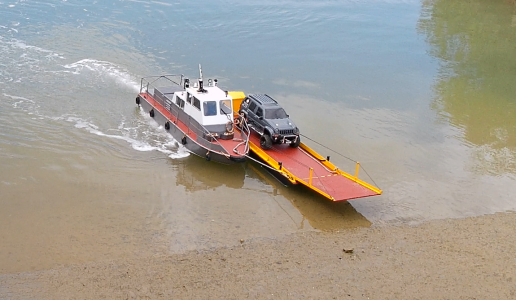
Got sick of waiting for the sampan to arrive with couplings etc for the boat (1.6 months now 😠,) so thought I would finish stage 2 of the project. I decided that being a trailer boat, it would look silly on a stand, so a trailer it was. Started this a while back now, and have been working on it along with stages 1 and 3. Takes forever, having to wait a month + for every single part to arrive for a project (and hoping they are suitable for purpose when they arrive), but finally getting somewhere.

The frame is made from 12x12mm aly angle, all screwed together with 3mm screws and nuts. The hull supports are from 8x8mm square brass tube, soldered to brass plates and bolted to the frame. The wooden support rails are drilled for a tight fit over the sq tube, set at the correct height then cyano'd in place. The tops of the rails are covered with stick on sponge rubber strips. The centre rollers are large plastic beads, turned to shape in the mill chuck using files, then painted and attached with 3mm screws. Winch post is also soldered square brass tube with plates soldered on.

The 'wobble roller' sets at the back are made from the same beads, just drilled to fit 3mm screws. The winch was made from 12mm aly channel and actually works, but more for looks than anything. The front dolly wheel is castering and can be locked up with a sleeve under the handle for 'towing'. The wheel itself is a small aircraft tail-wheel which was perfect for the job. Tail lights are plastic from a broken auto tail light, with painted balsa blocks behind, faced with ally foil for a reflector. The vertical trailer guide posts are 4mm brass tube, soldered to plates and bolted to the frame. These are covered with rubber auto fuel tubing, which was fitted by pushing the tubing on while blowing compressed air in the top to expand it. Detergent and water helped it slide on easier.

The guards were made over a wooden mould, using f/glass cloth and polyester resin. 'Mags' are 65mm car wheels which were black, till I repainted them with chrome paint. Boat and trailer combo weighs just over 7lbs (trailer is just over 1 lb)

As the boat has a very small keel, (none for the last 1/3rd,)and the hull doesn't actually touch the rollers, but sits just above them on the supports. Only the wobble rollers touch for support at the stern. Stage 3 almost done as well, but still waiting for a few more bits before 'putting it out there'😁.
Liked by RNinMunich and BOATSHED and
jbkiwi #70 of 93 1

HARTLEY FLARELINE, NEW PROJECT

Added a walkway on the trailer (as per original) and modified the dolly wheel, so that it now actually winds up for 'towing' (sort of forced to as it mysteriously fell off a stool, all by itself and damaged the shaft). I made a new shaft and threaded it (m3), then soldered the handle to an M3 nut. A dab of solder on the top as a stop for the nut, and Bob's your aunty. Unfortunately couldn't replicate a proper winder in that scale, (threaded shaft inside an internally threaded tube attached to the winder, and inside an outer tube cover) so the thread sticks out when wound up,- not the best but I'm not too worried about it. At least it works.😁

I had a bit more of a play with the jet unit and filed the rake off the rear of the new prop, as the tips kept touching the flow straightening guides in the rear housing and making a huge racket. I also tried a different coupling as my new ones have not arrived yet. I forced a length of 3mm ID silicone tube into a length of firm plastic tubing, (similar to tubes inside spray bottles) then forced it onto the jet and motor shafts. The plastic tubing should stop the silicone distorting, and ripping under power as it did last time, (the motor is pretty powerful for a brushed 540 on a 3s). The tube is touching both bearings so shouldn't move back hopefully, (soon hear if it does!).

Tried it in the big white indoor test tank and it was a lot quieter and seemed to have a much better flow rate than the std prop, as it's a more precise 'custom' fit in the housing. I'll be out for a test on the first good day (had a few crappy days lately with a lot of wind). Boat's probably a bit heavy for the size of the jet, (6lbs) but any bigger jet and it would be way out of scale, plus to go fast they need to be on brushless high kv motors. As long as it gets a scale speed I'll be happy😁.

I've also modified the reversing bucket nozzles (closed them in and re directed them slightly), hopefully improving reversing,- won't know till I get to the pond, (bath-tub's not a good indicator)
Liked by WellsBoi and Colin H and

Delete this post?

It will be removed from the site.

Discard this draft?

Your draft will be deleted and cannot be recovered.

You have an unfinished draft

What would you like to do with it?